How to Handle a Leash Properly—Learn the Secrets of the Pros!
This post contains affiliate links. These won’t cost you anything, but the commissions we may earn through them help offset the cost of dog treats. Thanks for your support!
This video/article will look at some of the pro leash handling techniques I use daily with dogs of all stripes. These keys will teach you how to handle a leash properly and build your confidence, stability, and ability. Let’s check it out!
A few years ago, I posted a video on some basic leash-handling skills. Good technique, though, is always evolving and growing, and since then, I’ve picked up some more things and developed my technique in the trenches with hundreds of dogs. I thought it was time to give you updated techniques and templates to work with. These templates will help you build your handling skills and confidence. If you are working on your reactive or aggressive dog, these techniques will be very important components of your work. Even if you’re not tackling big behaviors though, if you want to improve your skills in general, these will be powerful tools you can add to your repertoire. Like most good techniques, this stuff is endless.
There is a lot I could share with you, but for this first main lesson, we’ll focus on five categories:
- The base platform
- Slidelocks
- Leash locks
- Center of Gravity
- And Quickdraw techniques
We’ll start with just this stuff today so you can dip your feet in and get a feel for the basics before getting more technical.
GEAR UP
Before we get into the main pieces, let’s talk about your leash. These techniques work best with flat leashes—either leather, biothane, or nylon. Leather and biothane are my personal preferences. I recommended a 3/4″ in width for mid to large dogs or 1/2″ for small dogs. Nylon tends to be wider and rougher, which is why I don’t like it as well, but there are some good nylon leashes out there. There are some types I avoid:
- Rope leashes as these tend to make handling uncomfortable.
- Triangle handled dog leash (ski-handle) are not recommended unless you have grip issues due to arthritis or something like that.
- I also don’t like traffic handles. They get in my way, and, as you’ll see with these techniques, you don’t need one to hold your dog close anyway.
And please stop knotting your leash. Knots actually weaken the material, and they’re clumsy. After you’ve worked through the techniques in this video, you won’t need knots to hold onto your leash. I have specific recommendations for the brands that I like in our Buyer’s Guide, which we update regularly, and it’s free to download here on our website. So that you can practice along with me, I recommend attaching your leash to something stable (besides your dog), like a post or a piece of furniture. I want you to be able to work with the leash and have it give you enough resistance to practice the handling moves somewhat realistically. Now, let’s get to it!
THE BASE PLATFORM
One of the most common ways I’ve seen people hold their leash is like this, with the loop around their wrist, kind of like a square knot. This is fraught with problems. You don’t have any sensitive control, you can’t control leash length, it chafes your wrist and hand, AND you’ve locked up your joints, so you have to use the weakest muscles in your arm…it’s a mess. DON’T DO IT.
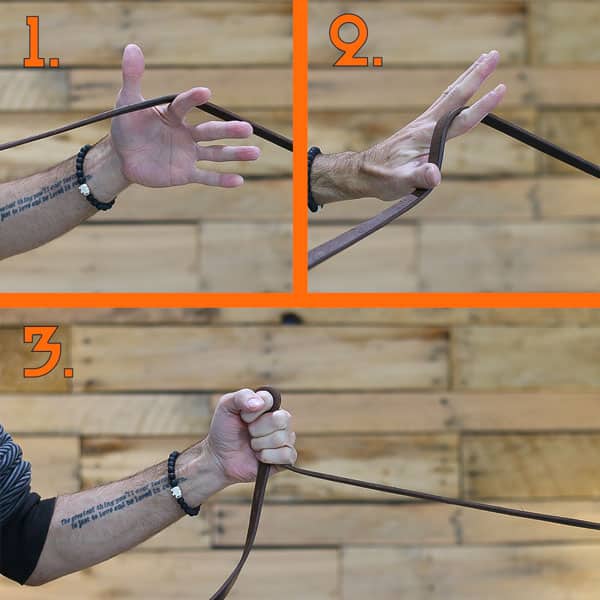
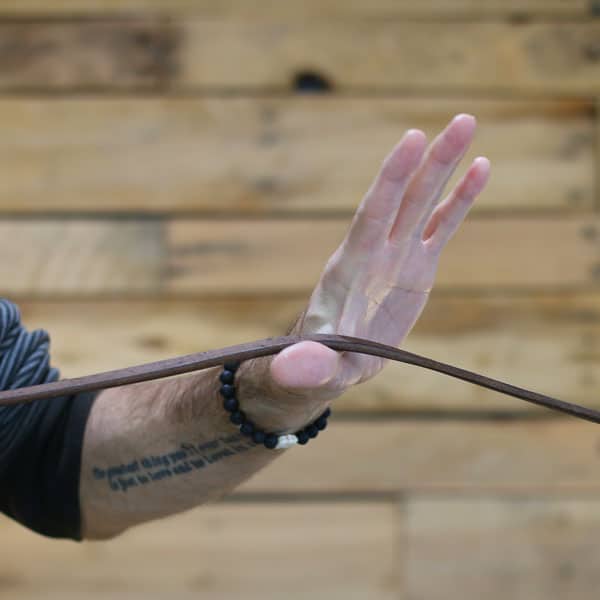
Likewise, DO NOT wrap the leash around your hand. You cannot control your dog effectively with it wrapped like spaghetti on a fork. Again, there’s no sensitive control, no dynamic control of length, and an increased potential for serious injury, including dislocating your wrist and even degloving, where the skin is removed from the hand. Let’s learn to handle a leash like a pro. Hook the loop on your thumb. Which hand you use depends on what you’re trying to do at the time, although ideally, you should learn to do all of these techniques with either hand.

The Base Platform
Everything we do from here on out starts with this, so get used to putting your leash loop on your thumb. Always start with this Base Platform.
THE SLIDELOCK
The Slidelock is a general-purpose tool. This is not a walking position, per se, but you will move THROUGH this position as you move your dog around the world.
- Start with your Base Platform (the loop on your thumb and running down across your palm)
- Bring the leash back up across your palm, from the pinky to the index side.
- Grip the leash as shown by pinching the leash between your thumb and index finger. Your thumb will be pointing to the distal end of the leash. This is THE SLIDELOCK.
The Slidelock position
Notice the length of leash in reserve. Relax your hand, and let the leash slide through your fingers, taking up the excess reserve. You have now increased the active length of your leash.
- Now, place your other hand palm up in front of the Slidelock, and slide it up the leash.
- Grip the leash with this hand and release the grip on your main hand.
- Move it up behind your other hand and regrip. Let go with your other hand. Now you’ve shortened the active part of your leash and put the excess back in reserve. Repeat the process of paying out the length and taking it back in.
Practice this movement at least five times. You should ideally be able to do it without looking at the leash.
Using the base platform allows me to stay connected to the leash even when I let go of it with this hand so that I can do other maneuvers without losing the leash. NOW, learn how to switch hands. This is easily done with an extra step.
- As before, take your distal hand and slide it up the leash.
- Grip the leash, and stick your thumb out like a horn. This is the receiver for the loop.
- Release the leash with your main hand, and drop the loop onto the thumb of the main hand.
- Grip the leash. Now, that hand is the main hand in the Slidelock position.
Practice paying out the length and switching between hands until it’s fluid and smooth. Do this at least five times. As before, you should be able to do this without looking. Touching your thumbs together to make a conduit might be helpful for you. Now, let’s get the shoulders involved. Step closer to your tie-off so you have a little natural slack on the leash. Instead of sliding your other hand up the leash to take up the slack, leave it where it’s at and use your shoulder to take it up. Repeat this five times. Make sure to practice both your left and right sides.
The Slidelock is a dynamic, basic hold. I use this when dogs are in sniff ‘n’ stroll mode or potty training—what my dad used to call “Snoopin’ and poopin’.” It’s also especially useful during transitional phases, such as getting in and out of a car or navigating doorways and stairs.
LEASH LOCKS
Now, it’s time to learn your anchors. Anchors are used when you’re actually moving and working with your dog. There are four of them, each with a unique character.
THUMBLOCK
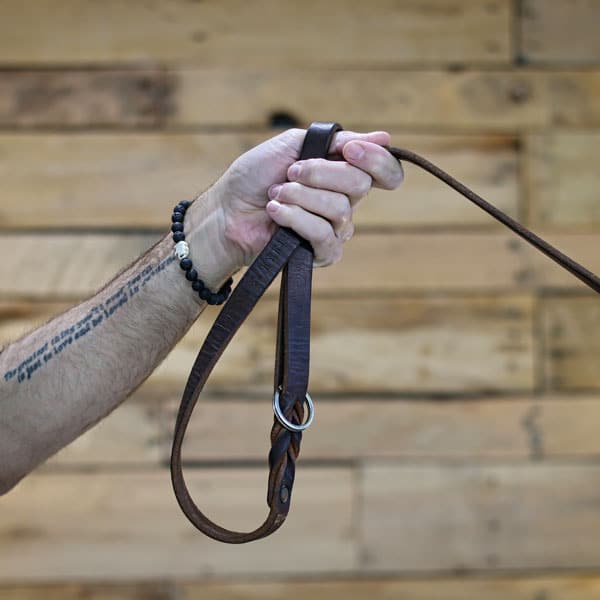
From the Base Platform, close your hand around the leash. Your thumb will act like a T-Bar. This is the most basic form of the Thumblock, and you can do this to hold fast to a long leash. To get to this anchor from the Slidelock position, roll your forearm and wrist so that you lay the leash back over and around the thumb. Make a fist around ALL the straps. The distal end of the leash—that is to say, the end running to your dog—should now exit from the pinky side of your palm.
The Thumblock
It’s important that you get all the pieces of the leash inside your fist. Don’t have any strays outside your fingers. This is a move you will use a lot in the real world, so practice moving to the Thumblock from the Slidelock and back again. Make sure to practice on both sides at least ten times.
Now, let’s get the shoulders involved again:
- Step closer to your tie out as before so you get some natural slack in the leash.
- With an OVERHAND grip this time, grab the leash in front of the Slidelock with your other hand. Use your shoulder to draw the slack out of the leash.
- Then, bring your loop hand back under your other hand, and use your other hand to lay the leash over your thumb. Slide your other hand down the bundle, and grip the whole bunch with the main hand. Now, you’ve got a Thumblock with all the excess leashes stowed elegantly and safely.
Practice this move ten or more times until you’re completely comfortable and smooth with it. Make sure you can do it on both sides.
Notice that the clip-end of the leash exits on the pinky side. This is the strongest way to hold a leash, and you’ll notice all of the Anchors and Safety Holds I teach employ this principle. You don’t want the leash coming out from the thumb side as this will lock up your joints, weaken the system and, more importantly, increase your response time in handling. Also, notice that the more you decrease the exit angle under your pinky, the more friction you add to the system, which makes it more stable. Point your top two knuckles downleash with a 90º exit angle for maximum security.
FINGERLOCK
The Fingerlock is very similar to the Thumblock. From the Slidelock position, release your bottom three fingers and leave the index finger so you’re pinching the leash with your thumb. Roll the leash forward over and around your index finger. Make a fist around ALL the straps. Your index finger will act like a friction device. The distal end of the leash should now exit from the pinky side of your palm.
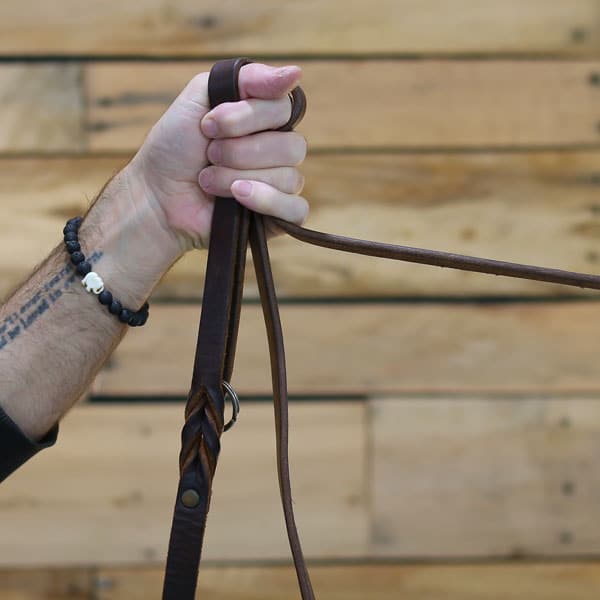
The Fingerlock
Again, practice moving between the Fingerlock and the Slidelock seamlessly, and make sure you can do it with both hands. From the Base Platform, take the leash at about the middle, but instead of laying this over the thumb, put it over the index finger. Close the entire leash bundle in your fist. Don’t let there be strays outside of your fist. Practice the Fingerlock until it’s smooth and easy for you to find it. As before, you can rotate your hand against the direction of the leash for more friction and control. A smaller angle means tighter control.
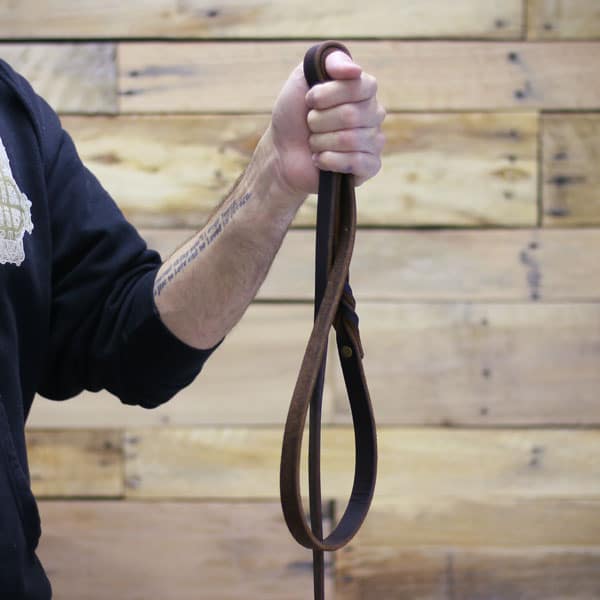
ACCORDION
From the Base Platform take the leash at about the middle and bring it up across your palm. Close your hand around the entire leash bundle. The leash should form a kind of “S” or serpentine shape as it folds up.

The Accordion hold
This is a fast, basic hold. It’s not as foolproof as the Thumblock or the Fingerlock, but it’s a fast and elegant method, especially if you have a longer leash and need to take up the length. It’s definitely solid enough for most basic movement around with your dog. A lot of folks like to use leashes that have traffic handles on them so that they grab them and hold their dog close, especially if they’re working with “big behaviors”—reactivity, or aggression, or just a strong puller. I don’t like those because they add all this weight to it, and they dangle; if you’ve got a leash-biter dog, it just invites some more of that behavior. So, I don’t really think it’s absolutely necessary, though, if you’ve got good technique.
If I’ve got this standard leash, I can go into an Accordion Hold, and I’ve got it just as close as I need it to be. I can change the length if I want to. If I want to go really close to it, I can. If I want to go a little farther away, or a little more relaxed, I can. Switch hands, I can. I don’t have any of this extra stuff on the leash. Really flexible. I can do anything I want with it. And I have just as much control as I would if I had a traffic handle without the extra weight or the bulk.
However, the exception to that would be if you have, let’s say, mobility issues or you struggle with joint issues, and manipulating the leash like I’m showing you in this video might be difficult for you. In that case, a traffic handle might be a good idea to help supplement some of the other work. That said, you should still learn how to do some of these templates so that they’re all working together. I want you to have much stronger control of the leash and not to rely on these small pieces like this because, even then, they’re still clumsy and just stop-gaps. As always, your mileage may vary!
You can generally use the Fingerlock, the Thumblock, and the Accordion Hold more or less interchangeably. Which one you use depends on your personal preference, your hand size, the material of the leash you’re using, and the dog you’re working with. It may change based on how you’re standing. It may even change if you’re wearing gloves in the Wintertime. So, you should be familiar with all three of them. Practice moving and switching between them until you can do it without unnecessary drag. The better you are at this now, the better you’ll be when you have to concentrate on other training.
THE BASEBALL BAT
The Baseball Bat hold is a safety position when you need to brace yourself. Unexpected things will happen in the world, and both you and your dog should be ready for them. From any of the Anchor Positions, use your other hand to grip the leash bundle directly underneath. This is a two-handed hold like you’d hold a baseball bat.
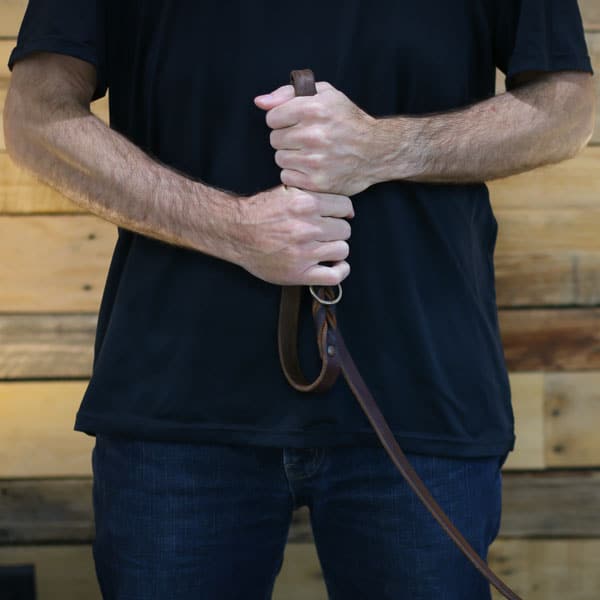
The Baseball Bat hold
Stick your elbows to your ribs, and bring both hands to your navel. Bend your knees, and stick your butt out to lower your center of gravity. This brings us to the next part of our leash-handling lesson.
CENTER OF GRAVITY
You need to stay on your feet and remain stable, especially if you have a strong dog and especially x2 if you have a dog that darts or lunges. Now, the most critical piece here is to change your body orientation. For some reason, many people tend to square up perpendicularly behind their dogs like they’re waterskiing. Don’t do this. Try it against the wall—you’ll feel it in your toes as they try to keep you upright. Don’t rely on your big toes to do the work! They’re too small!
Reorient your body and point your hip at your dog. Now you’re assuming a triangular shape with superior stability and using those bigger, skeletal muscles to do the job. In fact, you should absolutely get in the habit of keeping your hip oriented towards your dog pretty much all of the time. If you go back and look at this lesson, you’ll notice I’ve been pointing a hip downleash for this entire practice session.
Another consideration is your arms. Keep them close to your body. Except for some transitional moves, keep your arms close. A lot of people let their arms go out. The farther the leash anchor gets from your center of gravity, the easier you will be pulled off balance, even with a small dog. It’s important to start thinking about making your body do more work than your arms. Most people do all of their leash work with their arms. Your core and your legs are way bigger muscle groups that work better together and are all centralized around your center of gravity.
Brace a leash anchor to your centerline or your Opposite-Side hip for maximum stability when in a jam. Your feet should be shoulder-width apart. Unlock your knees and keep them bent. Keep your feet canted at about 45º with heel-toe alignment. Bend your knees deeper to lower your center of gravity if necessary. And just a quick side note here…
PSA: BEND YOUR KNEES!
It blows my mind how many people we work with do not bend their knees. We tell people “Bend your knees” all of the time—able-bodied folks, mind you—and they just can’t seem to do it. So, along with all of the stuff we’re talking about in this video, BEND YOUR KNEES. Now even if you have limited mobility, many of these principles can still be applied. We’ve worked with people of all ages and even people in wheelchairs, and you can usually still adapt and make accommodations to fit your personal situation. That’s why these are all templates so that you can take the main principles and re-apply them in new contexts. Kinda sounds like dog training in general. No matter what, keep your wits about you and your feet under you.
QUICKDRAW TECHNIQUES
This next set of technique templates shows you more ways to deploy these tools. Again, practice these in neutral settings so you’re comfortable with them before you need them. Just like your dog, you need to develop the motor skill and start imprinting some muscle memory.
RISING FINGERLOCK
The Rising Fingerlock is for taking up excess leash efficiently. This helps get a dog into Control Range quickly.
- With the palm facing you, your forefinger rises up underneath and makes contact with the leash and slides down the length of it.
- Once you’re at the length you want, rotate your hand palm down and catch the leash with your thumb.
- Spread your other fingers out and bring them over the strap.
- Close your hand over the leash and allow everything to lock into place. You should end up in a solid Fingerlock.
The Rising Fingerlock
Do this at least ten times or more until it’s smooth and fast. I use this one all of the time to take up slack quickly. This one is especially useful for long lines, too.
SWEEPING THUMBLOCK (AB)
Like the Rising Fingerlock, the Sweeping Thumblock takes up available slack very quickly to get your dog into control range. However, this is best done for changing direction and leaving quickly. This is a tough one so pay close attention. Several things are going to happen at once. In the (A) Variation:
- Sweep your other hand in towards the leash, palm down. You’ll catch the leash in the webbing between your thumb and forefinger.
- Bend your knees, pivot on your lead foot, and bring your trailing foot around to the front. Your body will rotate 180°.
- Simultaneously with this, rotate the sweeping hand, so the palm faces you, and as you pivot on your foot, continue the rotation so that the palm is facing upwards. This lays the leash over your thumb and across your palm.
- Close that hand and bring it to your centerline.
- At this point, your other hand could regrip the leash for a Baseball Bat Grip
Practice this one at least five times.
You’ll catch the leash in the webbing of your hand
The (B) variation is only slightly different:
- Use your shoulder to draw out excess slack through your other hand.
- Sweep your main hand down in front of your other hand and catch the leash in the webbing between your thumb and forefinger.
- Rotate your main hand, so your palm is facing you
- Raise your main hand and drop your other hand while releasing the leash, so you deposit the leash bundle into your hand.
- Close it up
See if you can nail this one five times in a row. The Sweeping Thumblock has many moving parts, so practice this until it all makes sense in your brain and fits together for you smoothly. You can even do that same move from the Rising Fingerlock. Technically you can even do an Accordion sweep. For regular Loose Leash Walking, I recommend choosing a side and sticking to it, and we’ve even got an older video/article on that.
SWITCHING SIDES
While teaching Loose Leash Walking training sessions, we use an Opposite-Side Hold where the leash goes across your body. For our students who have completed their walking training, we use the Same-Side Hold. I probably use this 90% of the time except for training phases. Also, when you’re working on rebooting big behaviors like reactivity and aggression, it’s better to use a Same-Side Hold for these instances as well. This keeps your dog in control range and increases the speed at which you can respond.
There will also be times in public when switching sides is recommended to put yourself as a buffer between environmental triggers and your dog. Since your thumb is the base platform, open up the bundle, hang it off your thumb, and pass it to your other thumb. Practice this with a decoy until it feels nice and smooth. Switching Sides keeps your dog from provocative stimuli, and you can also use this to navigate tight spaces. This also highlights for you why it’s important to be ambidextrous in your handling.
NOW GO PRACTICE!
WHEW! Take your time with all this stuff away from your dog until you feel comfortable making all the leash positions and moves with BOTH hands. You need to be ambidextrous with this stuff. Be prepared by working out the kinks in rehearsal before you end up on your face! Smaller dogs can be trickier mostly because the leash will be slightly longer due to their height, and they are easier to step on accidentally. Be mindful, and customize these templates for both you and your dog. I have to say, even with the real little guys, very little has to change.
Now QUESTIONS FOR YOU! There’s a lot more I can show you with this stuff, so would you be interested in seeing more? Also, what other things would you like to see Simpawtico make videos about? Let us hear from you in those comments. As always, keep learning, keep practicing, and we’ll see you soon. Thanks for watching!
LINKS AND RESOURCES
The links below are affiliate links. Please read our full Disclosure Policy
GET THE GEAR FROM THE VIDEO:
For the demo sections in the video, I used the Tiger Tail Urban Nomad biothane leash
For the walking demos in the video, I used the Dean and Tyler 3/4” x 6’ leather leash (my favorite ever)
The long line I used in the video was the Mendota 30’ check cord
The demo dog was the Melissa & Doug Husky
RELATED LEASH REVIEWS:
Tiger Tail Leash/Collar Review


Trackbacks for this post