")
How to Make & Use a Flirt Pole (a Must for Energetic Dogs!)
Instead of splurging on pricey interactive toys for your furry companion, cost-effective DIY options tend to perform better. Would you like to learn how to create the best flirt pole for dogs? Keep reading!
What is a flirt pole?
Flirt poles are essentially giant dog versions of the popular cat toys. It allows a dog to chase, catch, and tug without making a bunch of work for you. It’s a great interactive dog toy for super-active dogs. The good news is that you can make one with stuff from the hardware store for about $10-$15. You can download the Free PDF of this article, too. It has more diagrams, and it’s easy to print for your reference as you build your DIY flirt pole!
BENEFITS
- Promotes physical activity, mental stimulation and, most importantly, engagement.
- Super exercise. It’s way more work for your dog than you, so it’s a wonderful way to expend energy without feeling like you ran a marathon yourself.
- Great for small areas, or when the weather does not allow you to do other activities It improves coordination for both you and your dog. As you play, you probably have to keep evolving your “moves” as your dog learns to outmaneuver your old ones.
- You can use it to teach impulse control. Once your dog is invested in the game, you can insert pauses where you practice waits and/or stays, or even other obedience components.
- The dog gets to chase something at high speed but also stays close to you. This allows your dog to do “dog stuff” that’s right in their wheelhouse and still have a productive time with you. Counterbalancing this with tug, you may be able to use this to teach your dog to bring the toy to you (one of our “Rules of Engagement” with tug). Thus, you can even start back-chaining a retrieve. If you don’t have this part dialed in (i.e. your dog tends to run off with toys) this will help develop a habit of sticking around you.
CAUTION: this type of activity is for dogs in good physical condition. Avoid using with dogs who are obese, have joint problems, or have a heart condition.
SHOPPING LIST
- PVC PIPE: Ideally 4 to 5 feet long. We like 1” diameter for most dogs. “Schedule 40” is the stronger variety. If you have a smaller dog, you can do 3/4” or even 1/2” diameter. At that smaller size, it wouldn’t necessarily need to be the more expensive Schedule 40.
- BUTT CONNECTOR: This is just a PVC butt connector for the end of your pipe. This will add a little counterweight to the back end and give the ring a better seat against the pipe. Size this for the diameter of pipe you get.
- CORD or ROPE: Use a marine rope or camping rope. For smaller dogs, 550 paracord may be used. Sometimes you can get it cut to size at the hardware stores; you’ll only need between 8 to 12 feet of it.
- STEEL RING: Available at your hardware store. Get this according to the diameter of pipe you choose. For a 1” pipe, get a 2“ ring; for everything else, a 1.5” or 1” will be sufficient. This will be a stopper for the cord. OPTIONAL: use large washers. Stack several washers together for more counterweight.
- TUG TOY: Choose one of your dog’s favorite toys. This could be a rope, an animal shape, a rubber ring, or even just a rag. Faux fur plush toys can work really well for this too. Although, a lot of dogs are so into chasing they don’t care what it is.
- OPTIONAL: Athletic grip tape or electrical tape to wrap around the handle.
TOTAL COST: $10 to $15 (or less if you already have some of it!)
ASSEMBLY
You will want to customize your flirt pole to match your dog. This example is for any common, mid-sized dog. If your dog is smaller or larger, you’ll need to tweak this accordingly.
- Cut about 10 feet of cord. Sealing the ends with a match or lighter is a good idea. Be careful!
- Tie an anchor hitch knot on one end of the cord to the steel ring (see diagram A) Thread the cord through the butt connector first, and then the long pipe.
- Fit the butt connector to the pipe. You won’t need to glue this, although if you have some PVC glue handy, you can make this a permanent connection.
- Tie a slipknot on the other end of the cord (see diagram B). Use the slipknot to attach your dog’s toy to the rope (alternatively, if the toy has a loop or ring section, you could use another anchor hitch instead).
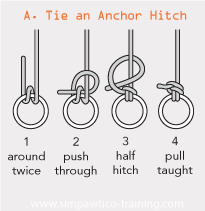
Diagram A
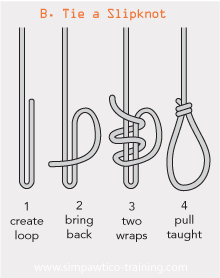
Diagram B
OPTIONAL: wrap some tape around the lower half of the pipe to improve your grip. THAT’S IT!
BASIC MOVES
Here are the basic maneuvers to use with your new flirt pole toy:
- Swing around and drag the toy lure on the ground. This simulates an animal running, which will trigger chase-drive with your dog.
- Snap or flick the pole to cause your toy lure to change direction suddenly. If you time this right—at the instant your dog would’ve grabbed it—this can ramp up their drive (we do the same move with our food rewards, sometimes!)
- Swinging or flicking the pole higher in the air entices your dog to jump and catch the toy.
IMPORTANT: This is not a game of “Keep Away.”
Let your dog catch the toy once in a while. This keeps them interested and avoids a build-up of frustration. If they get too frustrated they’ll bail out and lose intehorest in the game. Play tug with the toy lure once your dog has caught it. This is an opportunity to teach “Drop It” and, later, to insert those obedience pieces mentioned above.
OTHER GUIDELINES FOR SUCCESS
As with all activities with your dog, make sure to have a clear beginning and an end. Call your dog into the game, and then you decide when the game is over; don’t wait for your dog to tire out or lose interest. This preserves the integrity of your time together and tells your dog when they can put their attention to something else. Also, don’t let your dogs have their interactive toys when you’re not on the other end.
We always recommend that interactive toys are restricted access. This keeps your dog from destroying them, keeps them from getting possessive with them, and keeps them from learning how to satisfy themselves on a toy without you (in which case, what would they need you for?). So, once your game is over, the pole AND the toy lure get put away. We talk more about this in our post about the 4 Types of Toys. Rotate through your toy lures to keep things novel. The toys will probably also get tattered and dirty after a bit and require replacing anyways.
NOW GO GET THE STUFF, MAKE IT, AND HAVE FUN!
I hope this was helpful, and that you and your dog have a lot of fun with this! A DIY dog flirt pole is a great piece of kit to have around. As always, keep learning, keep practicing, and thanks for reading!


Trackbacks for this post